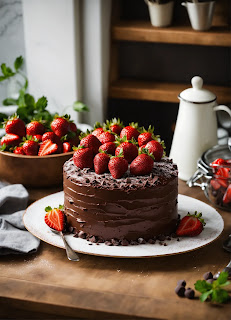
Chocolate Covered Strawberries
.webp)
Chocolate Covered Strawberries
Ingredients:
- 1 pint fresh strawberries (about 12-15)
- 200g (7 oz) dark or milk chocolate, chopped (or chocolate chips)
- 100g (3.5 oz) white chocolate, chopped (optional, for drizzling)
- A pinch of sea salt (optional, for contrast)
- Sprinkles, crushed nuts, or coconut flakes (optional, for decorating)
Instructions:
-
Prepare the Strawberries:
- Rinse the strawberries gently and pat them dry with paper towels. Make sure they are completely dry to prevent the chocolate from seizing up when dipped.
- Leave the green stems on for easy handling.
-
Melt the Dark or Milk Chocolate:
- In a heatproof bowl, place the dark or milk chocolate. Melt it using one of the following methods:
- Double Boiler: Place the bowl over a pot of simmering water, stirring occasionally until smooth and fully melted.
- Microwave: Place the chocolate in a microwave-safe bowl and heat in 20-30 second intervals, stirring in between, until the chocolate is fully melted and smooth.
-
Dip the Strawberries:
- Hold each strawberry by the stem and dip it into the melted chocolate, covering about 2/3 of the berry. Let any excess chocolate drip off before placing it on a parchment-lined tray.
-
Optional White Chocolate Drizzle:
- If you want to add a white chocolate drizzle, melt the white chocolate using the same method as above.
- Once the dark or milk chocolate layer has set (about 15 minutes), drizzle the melted white chocolate over the dipped strawberries using a spoon or piping bag.
-
Decorate (Optional):
- While the chocolate is still soft, you can sprinkle toppings like crushed nuts, sprinkles, or coconut flakes on the dipped chocolate for added texture and flavor. If you like a salty-sweet contrast, sprinkle a tiny pinch of sea salt.
-
Chill:
- Refrigerate the chocolate-covered strawberries for 30 minutes to 1 hour, or until the chocolate is fully set and firm.
-
Serve:
- Once the chocolate is hardened, the strawberries are ready to serve. Arrange them on a serving tray or enjoy them straight from the fridge!
Tips:
- Best to Use Fresh Strawberries: The key to making perfect chocolate-covered strawberries is using fresh, firm berries. Overripe berries may not hold up well after dipping.
- Storage: Store the strawberries in an airtight container in the refrigerator for up to 2-3 days. They are best when fresh.
- Customizing: You can experiment with different kinds of chocolate (white, milk, dark, or even ruby chocolate) or toppings like crushed Oreos, toffee bits, or colored sugar for a fun twist.
Enjoy your indulgent, homemade chocolate-covered strawberries! 🍓🍫
.webp)
.webp)
Comments
Post a Comment